Sunday 28 April 2013

Pots and Poppies

Hi All,
Sorry it's been so long since my last pyrography post, but I've been up to my neck in all sorts of things. Sadly, I have very little to show for all my efforts. It is really strange for me because when I worked in a factory for nine hours a day I seemed to have lots of spare time to go fishing, do some painting  etc, but now that I am self-employed and work from home I can't find two spare seconds to rub together.

There is some good news; I have sold three pyrography items this week from my shop on Folksy and they all left good feedback. This means I need to get cracking and replenish some of my stock and I have made a start with another trinket box. These seem to be very popular at the moment so I have done another one but without the usual flowers. I have just decorated it with contours that are done to look like the grain of the wood. See the photos below.
 
 
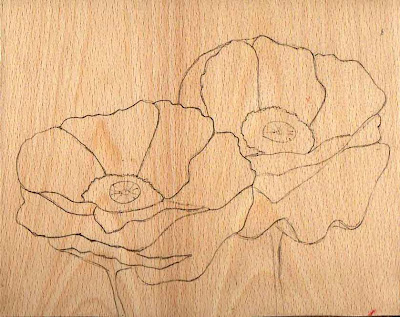
I am also keen on doing something a bit brasher with a lot of contrast, so my next pyrogrphy project is going to be a couple of large poppies that almost fill the frame that I have chosen for it. So far I have made up a board with a piece of MDF faced with beech veneer and I have drawn the outline of the poppies on it.

At the moment it looks like a template for a stained glass window but I'm hoping that by the time I've done the pyrography work it will come to life. If you would like to see the finished article please come back for my next post.

By the way, if you are wondering how I'm getting on with the oil paints that I had for my birthday. All I can say is that progress is slow, but I'm hoping to give it a good go this week.

Saturday 13 April 2013

Hare Again

Hi All,
I said last week that I was going to do another pyrography hare with the contours, so here it is.

I like the way it turned out and the simplicity of it. The phrase, 'sometimes less is more' is pretty well worn, but in this case it seems to fit. I got the frame from a charity shop and used that to size the piece of white birch veneer that I was going to do the pyrography on. This was then ironed onto a piece of MDF.

I'm still not sure about using MDF because of the health implication if one inhales the dust when working with it. The only solution I have is to do any cutting and sanding outside and hopefully the dust will get lost on the wind.

Anyway, after I'd used my pyrography iron to burn the outline of the hare, I drew the contours on freehand with a pencil. These were then subsequently burnt. Care needs to be taken when going around the curves and I find that it is best to do several short marks rather then trying to burn a long line in one go. Even when using veneer the grain of the wood can easily make the tip of a pyrography iron go off course and if two contour lines end up touching it ruins the whole effect.

The direction of the grain in a piece of wood needs to be taken into account when doing any pyrography work. I find that it is easy to maintain a straight line when burning a line that is 90 degrees to the grain, but keeping that line straight becomes increasingly difficult as I move around to going with the grain.

Whilst we are talking about grain, I also think that consideration should be given to matching the direction of the grain to the subject you are working on. For example, because the hare is running, I think it makes sense to have it going with the grain. It wouldn't work as well with the grain going the other way. If on the other hand I was to do a picture of a tree or a flower, I'd want the grain to go with the direction of growth so that it didn't jar the eye.

I'm not sure what my next project will be, but I will let you know soon. By the way, if anybody is interested, the hare is for sale on Folksy at a reasonable price.

Sunday 7 April 2013

Pyrography Hare

Hi all,
I'm pleased to tell you that I managed to do a bit of pyrography this week. My oil paints have also arrived along with me 62nd birthday, so be prepared to see my first foray into that medium in a few posts time.

Right, back to the pyrography. While I'm out and about I keep my eyes open for wooden items that could be suitable for some pyrography  treatment and find they come in handy. Earlier in the week, I was looking at a pencil box that I bought and, because of it's long thin shape, I was wondering what I could possible pyrograph onto it.
Anyway, I went back to a drawing of some hares that I'd done a couple of months ago on a big box and decided to use one of them. Obviously, these would be too big for the small pencil box, so I located the file on my computer and removed the hare at the back.
I then re sized the image of the single hare to fit the pencil box I was going to use. After transferring the image, I burnt in the outline with my pyrography iron, but didn't bother with any shading. I'd had in my mind for a while to do something different, so I drew some contour lines on the hare that I thought would loosely describe it's form and burnt them in. To make it stand out on the box, I then gave the hare a coat of  medium oak gloss varnish. I was careful not to put any of the colour on to the hare's eye because I wanted that to provide a highlight. Once oak varnish was dry, the whole box was given two more coats of clear gloss varnish to protect it. Here is the finished article.
I think it looks very good and I have decided to do a larger version on a piece of white beech veneer. I will let you see that in my next post if I get chance to do it.