

A blog about woodturning, pyrography and scroll sawing.Follow each project and gain an insight into how I go about creating images with my pyrography iron.
Wednesday, 2 May 2012
Pyrography Commission
Hi All,
Since I started doing a bit of pyrography, about a year ago, I have been asked on several occassions if I would do a commission.
One person wanted me to personnalise the handles of a set of hunting knives for them. Anyway, I didn't fancy it so I politely declined their request. I guess the main reason I haven't been doing commissions is that since leaving a factory environment I'd become used to doing what I want, when I want, and taking a commission would be like working for somebody else. I now make most of my living from writing, (pittance is the word that springs to mind) so I have total control over how I spend my time - well not quite, but I won't go into that now. If you would like to check out my books, here is the link.
Right, let's get back to the plot. Recently, I was asked by a friend if I'd do him a plaque to commmemorate his achievement of doing the Coast to Coast Walk, from St Bees Head in Cumbria, to Robin Hood's bay in Yorkshire. The walk covers a distance of about 190 miles according to Wainwright and 192 according to other sources. He'd done the walk some years ago and always wanted a plaque but he never got around to it. Actually, he was probably too busy walking up and down mountains in Scotland. This chap is also a Munroe bagger, a name that is used to describe the thousands of enthusiasts who want to walk up and down every Scottish mountain that is over 3000ft high. There are about 284 of them and I think he is about halfway through the list.
By the way, when he isn't rambling across the Highlands or the Northern Pennines, he is a gardener who specialises in drystone walling. He hasn't been doing the drystone walling for long but he is very good and one of the top men in the area. If you would like see what a good bit of walling looks like, take a look here.
Anyway, I agreed to do him the plaque if he gave me some details. So he sent me an email giving me the date of his walk and asked me to include a rucksack, some boots and a bit of drystone walling. Below is what I sent back for his approval before I started the pyrography burning process.
 I am glad to say that he's given me the go ahead and I will do the pyrography on it soon and post a picture of the finished article on here.
If you would like to see some more of pyrography work, please click here.
I am glad to say that he's given me the go ahead and I will do the pyrography on it soon and post a picture of the finished article on here.
If you would like to see some more of pyrography work, please click here.

Tuesday, 24 April 2012
The Finished Butterfly Bowl
Hi All,
In my last post I showed you how I did an outline of a pyrography image on a bowl. (Pictured below.)
 This was the easy bit. Now, believe it or not but some people who do pyrography stop there. However, by doing so they are missing out on the most exciting part of creating a piece of pyrography. To me the most important part of the pyrography process is not the outline, but the 'shading in' process.
You could of course just take your pyrography iron and start shading in your piece of work without much thought, but that would not lead to the best result. You need to think ahead, so here is how I go about the process.
Firstly, I look for the darkest areas of the image. In the case of the one above it will be the blackberries and the darker parts of the butterflies. So this is where I start; I use my iron on a medium to high temperature setting and burn in the fruits and the darkest part of the butterflies. This establishes the darkest tones of the pyrography piece. Yo can see the dark berries on the photo above.
Now all I have to do is shade in the leaves and stems. However, care must be taken here if you are to finish up with a good result. The leaves need to stand out against the plain light background of the bowl, but take care because, if the shading is made too dark it will weaken the impact of the butterflies. I turn the temperature down when 'shading in' and take my time. Always remember when you are doing pyrography that you can't rub your mistakes out and, if you burn a piece of your work to a tone that is too dark, you are stuck with it.
So, when you are 'shading in' always try to maximise the contrast in tones. If the edge of the leaf you are shading is against a plain piece of bowl you can make it darker. The same is true if you are coming up against a light part of a butterfly. However, where a leaf comes up against the dark part of a butterfly you need to make sure the shading is much lighter in tone.
Tips
Make sure that the direction of pyrography burn is natural and in line with with the subject matter. For instance, you will notice that the shading marks on the butterflies' wings spread out in a fan shape from the butterflies' body. This makes it look natural; if I'd done the 'shading in' from top to bottom it would have ruined the piece. The same can be said with the leaves. The direction of pyrography burn should follow what you think will depict the natural growth of each leaf.
Also remember that the point where your pyrography iron tip first touches the wood will be the darkest spot because the heat of the iron hasn't had time to dissipate yet. So always put your tip down where you want the darkest part of the burn to be. Take your time with the shading and you will get a feel for the whole process. Eventually you will find that you are changing your speed of movement to bring about those subtle changes in shade that can turn an alright piece of pyrography into something to be proud of. Below you can see my finished bowl.
This was the easy bit. Now, believe it or not but some people who do pyrography stop there. However, by doing so they are missing out on the most exciting part of creating a piece of pyrography. To me the most important part of the pyrography process is not the outline, but the 'shading in' process.
You could of course just take your pyrography iron and start shading in your piece of work without much thought, but that would not lead to the best result. You need to think ahead, so here is how I go about the process.
Firstly, I look for the darkest areas of the image. In the case of the one above it will be the blackberries and the darker parts of the butterflies. So this is where I start; I use my iron on a medium to high temperature setting and burn in the fruits and the darkest part of the butterflies. This establishes the darkest tones of the pyrography piece. Yo can see the dark berries on the photo above.
Now all I have to do is shade in the leaves and stems. However, care must be taken here if you are to finish up with a good result. The leaves need to stand out against the plain light background of the bowl, but take care because, if the shading is made too dark it will weaken the impact of the butterflies. I turn the temperature down when 'shading in' and take my time. Always remember when you are doing pyrography that you can't rub your mistakes out and, if you burn a piece of your work to a tone that is too dark, you are stuck with it.
So, when you are 'shading in' always try to maximise the contrast in tones. If the edge of the leaf you are shading is against a plain piece of bowl you can make it darker. The same is true if you are coming up against a light part of a butterfly. However, where a leaf comes up against the dark part of a butterfly you need to make sure the shading is much lighter in tone.
Tips
Make sure that the direction of pyrography burn is natural and in line with with the subject matter. For instance, you will notice that the shading marks on the butterflies' wings spread out in a fan shape from the butterflies' body. This makes it look natural; if I'd done the 'shading in' from top to bottom it would have ruined the piece. The same can be said with the leaves. The direction of pyrography burn should follow what you think will depict the natural growth of each leaf.
Also remember that the point where your pyrography iron tip first touches the wood will be the darkest spot because the heat of the iron hasn't had time to dissipate yet. So always put your tip down where you want the darkest part of the burn to be. Take your time with the shading and you will get a feel for the whole process. Eventually you will find that you are changing your speed of movement to bring about those subtle changes in shade that can turn an alright piece of pyrography into something to be proud of. Below you can see my finished bowl.
 I like this piece of work, it is much better than Olly the Owl that's for sure. Sorry it's not for sale because my wife thrust a twenty pound note at me as soon as she saw it. Speaking of my wife, she has been too busy galivanting to get the brushes out and fix Olly for me, but the day will come and I'll keep you posted.
If you would like to see some more of my pyrography work please click here.
If you would like to find out more about me and my books pleas click here.
Finally if you have any questions about pyrography or my books please let me know.
I like this piece of work, it is much better than Olly the Owl that's for sure. Sorry it's not for sale because my wife thrust a twenty pound note at me as soon as she saw it. Speaking of my wife, she has been too busy galivanting to get the brushes out and fix Olly for me, but the day will come and I'll keep you posted.
If you would like to see some more of my pyrography work please click here.
If you would like to find out more about me and my books pleas click here.
Finally if you have any questions about pyrography or my books please let me know.


Thursday, 19 April 2012
Butterflies and Brambles
Hi all
Having spent a couple of weeks creating Olly the Owl and getting little satisfaction from it, I thought I'd do something a little more intricate.
Here is how I went about it.
First,I did a rough sketch of some butterflies and blackberries and then scanned it into my computer. I then worked on it digitally until I arrived at an image that I think is pleasing.
The next step was to re size the image to fit the bowl that I was going to use for the pyrography. Once that was done I used trace down paper to transfer some of the image onto the bowl. I don't bother doing it completely because it becomes too time consuming. Once I have some of the main reference points in place I find that I can put the detail in with my pyrography iron. If you look at the image below you will see that all of the outline work has been completed and I have established the darkest tones on the berries. Whilst I'm at the outline stage of the image, I also have a major decision to make. Should I use the pyrography iron to shade in the various tone or should I use paint to create some colour within the subject. This decision is always a hard one and you will have to use your own judgement.
In this case I will not be using any colour; I'll let the pyrography iron do its stuff.Having made that decision, I will use the pyrography iron to shade in the image by using a range of tones. Leaving the pyrography iron in one place for a longer amount of time will obviously produce a darker tone. The same affect can of course be achieved by turning up the heat control on the pyrography iron. I tend to favour the former because I believe it gives me more control and I am able to produce a wider range of tones with this method.
In my next post you will be able to see the finished result. I'm keeping my fingers crossed and hope it turns out better than the owl. By the way, if you are wondering how Olly is getting on; my wife hasn't got her brushes out yet.
If you would like to see more of my pyrography work please click here.
If you would like to buys some at discounted prices from my shop at folksy.com
Finally if you want to find out more about me, my books or other writing, please visit my main website which can be found here.
Having spent a couple of weeks creating Olly the Owl and getting little satisfaction from it, I thought I'd do something a little more intricate.
Here is how I went about it.
First,I did a rough sketch of some butterflies and blackberries and then scanned it into my computer. I then worked on it digitally until I arrived at an image that I think is pleasing.
The next step was to re size the image to fit the bowl that I was going to use for the pyrography. Once that was done I used trace down paper to transfer some of the image onto the bowl. I don't bother doing it completely because it becomes too time consuming. Once I have some of the main reference points in place I find that I can put the detail in with my pyrography iron. If you look at the image below you will see that all of the outline work has been completed and I have established the darkest tones on the berries.
 Whilst I'm at the outline stage of the image, I also have a major decision to make. Should I use the pyrography iron to shade in the various tone or should I use paint to create some colour within the subject. This decision is always a hard one and you will have to use your own judgement.
In this case I will not be using any colour; I'll let the pyrography iron do its stuff.Having made that decision, I will use the pyrography iron to shade in the image by using a range of tones. Leaving the pyrography iron in one place for a longer amount of time will obviously produce a darker tone. The same affect can of course be achieved by turning up the heat control on the pyrography iron. I tend to favour the former because I believe it gives me more control and I am able to produce a wider range of tones with this method.
In my next post you will be able to see the finished result. I'm keeping my fingers crossed and hope it turns out better than the owl. By the way, if you are wondering how Olly is getting on; my wife hasn't got her brushes out yet.
If you would like to see more of my pyrography work please click here.
If you would like to buys some at discounted prices from my shop at folksy.com
Finally if you want to find out more about me, my books or other writing, please visit my main website which can be found here.
Sunday, 15 April 2012
Olly the Owl
Hi All,
Have you ever been to the hairdressers and after having explained clearly the haircut you wanted, you came out with something completely different. Well if you have, you will know how I felt when I finished my latest pyrography creation. Up until now almost everything I have done regarding pyrography has turned out more or less to plan. However, my latest effort looks nothing like the image I had in my mind when I started. To make matters worse, this item wasn't something that I knocked up in five minutes, several hours went into it. You can see Olly on the right.
When I started Olly, the vision I had in my head was of an owl peering out of the hole in a tree. The idea was based on a photograph of an owl that I took at the Argyll Zoo, near Inveraray in Scotland. Once I'd drawn the image I coloured it in with Derwent coloursoft pencils. These are lovely to work with and I thought I would be able to blend in a lot of colours. That was a mistake; wood is not a good surface for more than two layers of pencil. There simply isn't enough tooth in the wood to accommodate the number of layers I would need. Perhaps I should have sanded the wood down again and made a fresh start but I fooled myself into thinking it was good enough.
The next step was to burn in the bark. My plan at this stage was to try and make it look as realistic as possible. However, the time it took to complete just a small area of bark was ridiculous and, seeing as I had no confidence in the owl, I compromised and came up with a stylised bark design. It's funny really because when my wife eventually managed to stop laughing at my owl she said she really liked the bark.
Still it wasn't all waste; all pyrography is therapy so at least I was relaxed while I was burning it. Luckily for me, there is still hope on the horizon for Olly the Owl. My wife reckons she knows what is wrong with him and she is going to paint over him using acrylic paints. It might take a couple of weeks before she picks up her brushes and gets on with it, but I promise to show you the results when she has finished.
The moral of the story is; enjoy doing your pyrography and if it comes out great, treat it as a bonus.
I would be interested to hear what you think of Olly the Owl, so if you have any comments or any other questions about pyrography, please let me know.
To see more of my pyrography please click here,
or to visit my discount pyrography shop on Folksy.com please click here.
Finally,if you would like to know more about me and my books please click here.
Have you ever been to the hairdressers and after having explained clearly the haircut you wanted, you came out with something completely different. Well if you have, you will know how I felt when I finished my latest pyrography creation. Up until now almost everything I have done regarding pyrography has turned out more or less to plan. However, my latest effort looks nothing like the image I had in my mind when I started. To make matters worse, this item wasn't something that I knocked up in five minutes, several hours went into it. You can see Olly on the right.

When I started Olly, the vision I had in my head was of an owl peering out of the hole in a tree. The idea was based on a photograph of an owl that I took at the Argyll Zoo, near Inveraray in Scotland. Once I'd drawn the image I coloured it in with Derwent coloursoft pencils. These are lovely to work with and I thought I would be able to blend in a lot of colours. That was a mistake; wood is not a good surface for more than two layers of pencil. There simply isn't enough tooth in the wood to accommodate the number of layers I would need. Perhaps I should have sanded the wood down again and made a fresh start but I fooled myself into thinking it was good enough.
The next step was to burn in the bark. My plan at this stage was to try and make it look as realistic as possible. However, the time it took to complete just a small area of bark was ridiculous and, seeing as I had no confidence in the owl, I compromised and came up with a stylised bark design. It's funny really because when my wife eventually managed to stop laughing at my owl she said she really liked the bark.
Still it wasn't all waste; all pyrography is therapy so at least I was relaxed while I was burning it. Luckily for me, there is still hope on the horizon for Olly the Owl. My wife reckons she knows what is wrong with him and she is going to paint over him using acrylic paints. It might take a couple of weeks before she picks up her brushes and gets on with it, but I promise to show you the results when she has finished.
The moral of the story is; enjoy doing your pyrography and if it comes out great, treat it as a bonus.
I would be interested to hear what you think of Olly the Owl, so if you have any comments or any other questions about pyrography, please let me know.
To see more of my pyrography please click here,
or to visit my discount pyrography shop on Folksy.com please click here.
Finally,if you would like to know more about me and my books please click here.
Wednesday, 4 April 2012
Sourcing Images
Hi All,
Having described in my last post how I create images, I thought it might be useful to explain where I get my images from in the first place.
One thing you shouldn't do is infringe another person's copyright. The leaves on the clock pictured left are entirely my own creation and that is what we should all be striving to do when creating pyrography pieces.
Being an artist and author myself I can tell you now that I would take a very dim view of anybody copying my work, especially if they tried to pass it off as their own. Where possible I always try to work from my own sketches or my own photographs. By doing this I don't have to worry about copyright infringements because everything I create is my own.
When I first started doing some pyrography I bought a popular book on the subject and started going through the exercises in the book. Most of my efforts turned out well and, as I progressed, I created a very nice piece that was based on one of the exercises in the book. Being like most artists, I like to show off my work and thought it would look nice on my art website amongst some of my paintings. However, being wary of copyright infringement I found the e-mail address of the publisher at the front of the book and sought permission to display the work on my website. I thought I'd get an e-mail back in a couple of days saying go ahead. After all I thought it would be good publicity for their book. How silly was I, it took no less than three months to get an answer and, although it was yes, it came with the following conditions.
I could display the work on 1 website only
I must not offer the work for sale
I must acknowledge the author of the book
I must mention the publisher
I must provide them with half a pint of blood. (Only joking but you get my drift)
Anyway, after this experience I decided to concentrate on my own images. Having said that, there are some images that you can copy from anywhere and I doubt anybody will know where the original came from. Images of butterflies, birds and flowers for instance are so common and available that nobody would know where you got the image from. Take the Peacock butterfly that I did on the book marker on the right. It is copied from one of my own photos but you will find images in books and on the Internet that could all provide the same source. By the time you've burnt it into a bit of wood with your pyrography iron, who on earth is going to know where it came from?

I would advise anyone who is taking up pyrography to take lots of photographs and use them for the basis of their work. Sometimes my wife and I take our sketch books with us when we drive out into the countryside. We pick some interesting wild flowers and then sketch them. I also keep a small sketch book in the car and when my wife pops into a shop for something quick (For quick, read at least 20minutes)I get out my pencil and do some sketching of trees or whatever other bits of flora and fauna are available. On the left you can see a bookmarker that was based on a birch twig that I sketched whilst my wife had popped into a shop. The eagle eyed amongst you might notice that I burnt the word Beech into it, well we can all make mistakes and it is an unfortunate thing about pyrography. You need to be careful because you can't rub them out or paint them over.
You will find that using your own photos or sketches will enhance your feeling of achievement.
The latest Item I have been working on seems to have been taking me forever, but it is finally coming to an end. I will share it with you in my next post.
If you would like to see some of my pyrography please click here
Information about me and my books can be found here
Having described in my last post how I create images, I thought it might be useful to explain where I get my images from in the first place.

One thing you shouldn't do is infringe another person's copyright. The leaves on the clock pictured left are entirely my own creation and that is what we should all be striving to do when creating pyrography pieces.
Being an artist and author myself I can tell you now that I would take a very dim view of anybody copying my work, especially if they tried to pass it off as their own. Where possible I always try to work from my own sketches or my own photographs. By doing this I don't have to worry about copyright infringements because everything I create is my own.
When I first started doing some pyrography I bought a popular book on the subject and started going through the exercises in the book. Most of my efforts turned out well and, as I progressed, I created a very nice piece that was based on one of the exercises in the book. Being like most artists, I like to show off my work and thought it would look nice on my art website amongst some of my paintings. However, being wary of copyright infringement I found the e-mail address of the publisher at the front of the book and sought permission to display the work on my website. I thought I'd get an e-mail back in a couple of days saying go ahead. After all I thought it would be good publicity for their book. How silly was I, it took no less than three months to get an answer and, although it was yes, it came with the following conditions.
I could display the work on 1 website only
I must not offer the work for sale
I must acknowledge the author of the book
I must mention the publisher
I must provide them with half a pint of blood. (Only joking but you get my drift)
Anyway, after this experience I decided to concentrate on my own images. Having said that, there are some images that you can copy from anywhere and I doubt anybody will know where the original came from. Images of butterflies, birds and flowers for instance are so common and available that nobody would know where you got the image from.
 Take the Peacock butterfly that I did on the book marker on the right. It is copied from one of my own photos but you will find images in books and on the Internet that could all provide the same source. By the time you've burnt it into a bit of wood with your pyrography iron, who on earth is going to know where it came from?
I would advise anyone who is taking up pyrography to take lots of photographs and use them for the basis of their work. Sometimes my wife and I take our sketch books with us when we drive out into the countryside. We pick some interesting wild flowers and then sketch them. I also keep a small sketch book in the car and when my wife pops into a shop for something quick (For quick, read at least 20minutes)I get out my pencil and do some sketching of trees or whatever other bits of flora and fauna are available. On the left you can see a bookmarker that was based on a birch twig that I sketched whilst my wife had popped into a shop. The eagle eyed amongst you might notice that I burnt the word Beech into it, well we can all make mistakes and it is an unfortunate thing about pyrography. You need to be careful because you can't rub them out or paint them over.
You will find that using your own photos or sketches will enhance your feeling of achievement.
The latest Item I have been working on seems to have been taking me forever, but it is finally coming to an end. I will share it with you in my next post.
If you would like to see some of my pyrography please click here
Information about me and my books can be found here
Monday, 19 March 2012
Creating Images
Hi all
Sorry that this post is a bit late but I have been working hard on publishing the second book in the Fishing Detectives series.
It is called Bun In The Oven and is now available on kindle. click here for more details.
Right, let's get back to the pyrography. Creating images and adding them to a piece of wood for the purposes of pyrography is challenging, not least because the wood you will be working with will be an odd shape. However, the process is fun and satisfactory results can be achieved in two ways. The first and most difficult, especially if you want to create a repeat pattern, is to draw the image straight onto the wood using a pencil. If you make a mistake, pencil can be erased from wood in just the same way as it can from paper. This method may seem like the simplest method for creating images especially if you are good at drawing.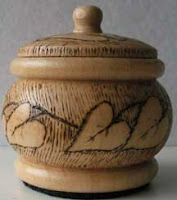 However, if you aren't good at drawing and you are working with repeat patterns, as in the trinket pot on the right, you may find method two better.
Having said that, to use method two you need to be reasonably comfortable with using imaging software. I use photoshop elements and find that is more than able to cope with anything I would like to do.
In the rest of this post I will go through the process I use for creating repeat patterns like the leaves on the trinket pot above.
Step 1 On my sketch pad,I draw the outline of the image that I have in my head and modify the design until I am happy with it.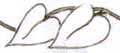 I guess you can appreciate how difficult it would be to draw the pattern above onto the the trinket pot because by the time I'd drawn the pattern and repeated it there would be no chance of the pattern joining up once I had gone around the pot. So let's move onto the second step.
Step 2 I measure the circumference of the pot and then create a new image in photoshop that fulfills the size requirements. The size of the trinket pot was 17cm in circumference and I decided on a pattern that was 1.8cm tall.
Step 3 I scan my drawing of the leaves pattern and then copy it onto the the new image I have created in photoshop. Once that is done I can start to play with it by altering the size etc.
Step 4 I copy and paste the image as many times as required to fill the space on my new image. Once this is done I know that I have a repeat pattern that will go around the trinket box sucessfully. Step 5 I print off a copy of the image
Step 6 I transfer a copy of the image onto the trinket pot using trace down paper. This is similar to tracing paper but works in the same way as carbon paper. I find that it is beneficial to stick the trace down paper and the image I am transferring with masking tape. I do this to make sure that nothing moves during the transfer process.
A note of warning here; I tried using carbon paper to transfer an image onto wood prior to doing some pyrography work on it and it was a disaster. Carbon paper does not erase, so if you do not burn through all of the marks you have made on the wood they will show through in the finished piece and make it look scruffy.
Step 7 Remove the image and the trace down paper and you should be left with a copy of your design on the wood ready for your pyrography.
The process I've just been through may seem a little complicated, but once you have mastered the techniques involved you will find you enjoy the design aspect as much as the actual pyrography.
If you need any help with understanding the process described above or any other help with pyrography issues please don't hesitate to get in touch. If you would like to see more of my pyrography work please click here
I sell some of my pyrography work on Folksy.com if you would like to take a look, here is the link
Finally, if you would like to find out more about me or my books click here.
Sorry that this post is a bit late but I have been working hard on publishing the second book in the Fishing Detectives series.

It is called Bun In The Oven and is now available on kindle. click here for more details.
Right, let's get back to the pyrography. Creating images and adding them to a piece of wood for the purposes of pyrography is challenging, not least because the wood you will be working with will be an odd shape. However, the process is fun and satisfactory results can be achieved in two ways. The first and most difficult, especially if you want to create a repeat pattern, is to draw the image straight onto the wood using a pencil. If you make a mistake, pencil can be erased from wood in just the same way as it can from paper. This method may seem like the simplest method for creating images especially if you are good at drawing.
 However, if you aren't good at drawing and you are working with repeat patterns, as in the trinket pot on the right, you may find method two better.
Having said that, to use method two you need to be reasonably comfortable with using imaging software. I use photoshop elements and find that is more than able to cope with anything I would like to do.
In the rest of this post I will go through the process I use for creating repeat patterns like the leaves on the trinket pot above.
Step 1 On my sketch pad,I draw the outline of the image that I have in my head and modify the design until I am happy with it.
 I guess you can appreciate how difficult it would be to draw the pattern above onto the the trinket pot because by the time I'd drawn the pattern and repeated it there would be no chance of the pattern joining up once I had gone around the pot. So let's move onto the second step.
Step 2 I measure the circumference of the pot and then create a new image in photoshop that fulfills the size requirements. The size of the trinket pot was 17cm in circumference and I decided on a pattern that was 1.8cm tall.
Step 3 I scan my drawing of the leaves pattern and then copy it onto the the new image I have created in photoshop. Once that is done I can start to play with it by altering the size etc.
Step 4 I copy and paste the image as many times as required to fill the space on my new image. Once this is done I know that I have a repeat pattern that will go around the trinket box sucessfully.
 Step 5 I print off a copy of the image
Step 6 I transfer a copy of the image onto the trinket pot using trace down paper. This is similar to tracing paper but works in the same way as carbon paper. I find that it is beneficial to stick the trace down paper and the image I am transferring with masking tape. I do this to make sure that nothing moves during the transfer process.
A note of warning here; I tried using carbon paper to transfer an image onto wood prior to doing some pyrography work on it and it was a disaster. Carbon paper does not erase, so if you do not burn through all of the marks you have made on the wood they will show through in the finished piece and make it look scruffy.
Step 7 Remove the image and the trace down paper and you should be left with a copy of your design on the wood ready for your pyrography.
The process I've just been through may seem a little complicated, but once you have mastered the techniques involved you will find you enjoy the design aspect as much as the actual pyrography.
If you need any help with understanding the process described above or any other help with pyrography issues please don't hesitate to get in touch. If you would like to see more of my pyrography work please click here
I sell some of my pyrography work on Folksy.com if you would like to take a look, here is the link
Finally, if you would like to find out more about me or my books click here.
Friday, 2 March 2012
Pyrography: Adding Colour
Hi all,
In the hands of a skilled pyrographer the iron can be used to create an endless number of shades that give life and vibrancy to the image. The darkest colour tones, which can be almost black, are created by leaving the pyrography iron tip in one place for a longer period of time or by increasing the temperature setting of the iron.
However, some subjects are more easily brought to life with some subtle colour.
Having said that, care needs to be taken to not spoil the pyrography work by just colouring it in like a child's painting. Using colour with pyrography is definitely a case of where less, is more. Above you can see a fox that I did with my pyrography iron on a solid piece of wood. It really came to life after I'd used water soluble pencils to liven it up.Last week I showed a picture of a pyrography honey pot and that shows just about the limit of how far I would go with adding colour. A picture of the honey pot can be seen on the left. The bees and flowers were coloured using water soluble colour pencils. I then sprayed the pot with a can of vanish to seal the colours before brushing on a further two coats of vanish. The reason I sealed the colour with a spray varnish was because, if I'd used a brush to put varnish onto the watercolour pencils, it would have either smudged the colour or made it run. Once the spray varnish has dried, normal varnished can be brushed on without any danger of ruining the work.
Sometimes if a solid colour is required, like the red hearts on the trinket pot on the right, I will use artists' acrylic paint. However because I am painting directly onto wood I always use a base coat of white before putting the colour on top. This makes the final colour shine through and gives a much more vibrant finish..
I am currently working on another wildlife piece but this time I am using wax based coloured pencils to give it a bit of zing. If all goes well this week I will put a picture of it on my next post. Also in my next post I will explain how I go about creating the images that I use in my pyrography work.
If you would like to see some more of my pyrography work please click here.
If you would like to visit my discounted pyrography shop at folksy.com
Finally if you want to find out more details about me or my books please
click here.
In the hands of a skilled pyrographer the iron can be used to create an endless number of shades that give life and vibrancy to the image. The darkest colour tones, which can be almost black, are created by leaving the pyrography iron tip in one place for a longer period of time or by increasing the temperature setting of the iron.
However, some subjects are more easily brought to life with some subtle colour.

Having said that, care needs to be taken to not spoil the pyrography work by just colouring it in like a child's painting. Using colour with pyrography is definitely a case of where less, is more. Above you can see a fox that I did with my pyrography iron on a solid piece of wood. It really came to life after I'd used water soluble pencils to liven it up.Last week I showed a picture of a pyrography honey pot and that shows just about the limit of how far I would go with adding colour. A picture of the honey pot can be seen on the left.
 The bees and flowers were coloured using water soluble colour pencils. I then sprayed the pot with a can of vanish to seal the colours before brushing on a further two coats of vanish. The reason I sealed the colour with a spray varnish was because, if I'd used a brush to put varnish onto the watercolour pencils, it would have either smudged the colour or made it run. Once the spray varnish has dried, normal varnished can be brushed on without any danger of ruining the work.
Sometimes if a solid colour is required, like the red hearts on the trinket pot on the right, I will use artists' acrylic paint. However because I am painting directly onto wood I always use a base coat of white before putting the colour on top. This makes the final colour shine through and gives a much more vibrant finish..

I am currently working on another wildlife piece but this time I am using wax based coloured pencils to give it a bit of zing. If all goes well this week I will put a picture of it on my next post. Also in my next post I will explain how I go about creating the images that I use in my pyrography work.
If you would like to see some more of my pyrography work please click here.
If you would like to visit my discounted pyrography shop at folksy.com
Finally if you want to find out more details about me or my books please
click here.
Subscribe to:
Posts (Atom)