Sorry that this post is a bit late but I have been working hard on publishing the second book in the Fishing Detectives series.

It is called Bun In The Oven and is now available on kindle. click here for more details.
Right, let's get back to the pyrography. Creating images and adding them to a piece of wood for the purposes of pyrography is challenging, not least because the wood you will be working with will be an odd shape. However, the process is fun and satisfactory results can be achieved in two ways. The first and most difficult, especially if you want to create a repeat pattern, is to draw the image straight onto the wood using a pencil. If you make a mistake, pencil can be erased from wood in just the same way as it can from paper. This method may seem like the simplest method for creating images especially if you are good at drawing.
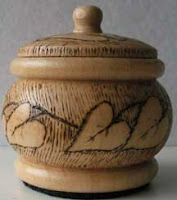
 However, if you aren't good at drawing and you are working with repeat patterns, as in the trinket pot on the right, you may find method two better.
Having said that, to use method two you need to be reasonably comfortable with using imaging software. I use photoshop elements and find that is more than able to cope with anything I would like to do.
In the rest of this post I will go through the process I use for creating repeat patterns like the leaves on the trinket pot above.
Step 1 On my sketch pad,I draw the outline of the image that I have in my head and modify the design until I am happy with it.
 I guess you can appreciate how difficult it would be to draw the pattern above onto the the trinket pot because by the time I'd drawn the pattern and repeated it there would be no chance of the pattern joining up once I had gone around the pot. So let's move onto the second step.
Step 2 I measure the circumference of the pot and then create a new image in photoshop that fulfills the size requirements. The size of the trinket pot was 17cm in circumference and I decided on a pattern that was 1.8cm tall.
Step 3 I scan my drawing of the leaves pattern and then copy it onto the the new image I have created in photoshop. Once that is done I can start to play with it by altering the size etc.
Step 4 I copy and paste the image as many times as required to fill the space on my new image. Once this is done I know that I have a repeat pattern that will go around the trinket box sucessfully.
 Step 5 I print off a copy of the image
Step 6 I transfer a copy of the image onto the trinket pot using trace down paper. This is similar to tracing paper but works in the same way as carbon paper. I find that it is beneficial to stick the trace down paper and the image I am transferring with masking tape. I do this to make sure that nothing moves during the transfer process.
A note of warning here; I tried using carbon paper to transfer an image onto wood prior to doing some pyrography work on it and it was a disaster. Carbon paper does not erase, so if you do not burn through all of the marks you have made on the wood they will show through in the finished piece and make it look scruffy.
Step 7 Remove the image and the trace down paper and you should be left with a copy of your design on the wood ready for your pyrography.
The process I've just been through may seem a little complicated, but once you have mastered the techniques involved you will find you enjoy the design aspect as much as the actual pyrography.
If you need any help with understanding the process described above or any other help with pyrography issues please don't hesitate to get in touch. If you would like to see more of my pyrography work please click here
I sell some of my pyrography work on Folksy.com if you would like to take a look, here is the link
Finally, if you would like to find out more about me or my books click here.

No comments:
Post a Comment