Hi all,
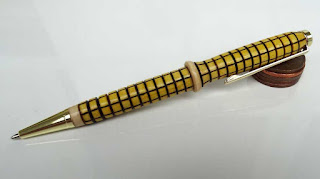
In my last post I said I would show you the pen I was about to turn and another shelfie. Well here is the pen.
Yellow and black and puts me in mind of wasps, of which there are many at the moment. I keep a swatter by my side at all times whilst sitting in the garden. I know there a few people who are of the opinion that if you leave wasps alone they wont hurt you, well if you think that, I' sorry , but it is only a matter of time before you get stung. My mother in law and my step daughter were both in the live and let live camp until they were stung this year. Suddenly they have gone off wasps.
Anyway, back to the pen. It wasn't supposed to be that colour. When I first turned it and cut in the beads I tried to make it look like basket weave. So, I coloured in a pattern with red and black markers and left some of the squares the natural wood colour. I'll be honest with you, it was crap, so I lightly turned the colours away and re did the pyrography lines. I'm very pleased with the pyrography, the long lines were marked out using the indexing facility on my lathe, and burnt in with my Peter Childs pyrography iron. The lines which go around the pen were burnt in by holding a piece of veneer in the groove that was left by the beading tool. The colouring was done with a yellow Winsor and Newton pro marker and I think it has come out rather well.
Right, onto the Shelfie. This one is a little bit smaller than the first one I did and he has his eyes under his hat. I made it small because I wanted to see what he looked like painted.
Here is the original that I recently posted.
And here is the new one, which I have painted.
Not sure which is best, so I'm going to do one the same size as the first and paint that to see what it looks like. I'm also working on a new pyrography egg for my collection. This one has a harebell design on it. I will hopefully show you them in my next post. My only problem at the moment is time. My mrs has a list of jobs for me to do including fitting a new cooker. Not an easy job because it will entail cutting a space in the work surface, please keep your fingers crossed for me and I will tell you how I got on in my next post.


No comments:
Post a Comment