Wednesday, 22 February 2012

Pyrography wood sources

One of the most exciting things about pyrography is discovering bits of wood upon which to do some pyrography work.

Since I took up the hobby in April 2011 I have sourced wood from many places. If you search the Internet for pyrography supplies you will get a few websites that have a good range of wooden items. One that I have used frequently is found at this website They sell a full range of wooden items and tools associated with pyrography. Service is friendly while delivery is quick and reasonably priced.

Another company I have used to get wood from is Craft-supplies who are based in Bradwell, a nice little village at the southern end of the peak district. I haven't tried using their internet based service because I always go there in person. Bradwell is a nice day trip out for me and the wife. We have a spot of lunch in the beautiful peak district and enjoy the stunning scenery all the way there and back.
Lots of cheap items can also be found in shops that sell kitchen items. On the left you can see a cheese board onto which I burnt a blackberry design. Wooden spoons are very cheap and look very nice with a pyrography pattern burnt into them. You can also find cutting boards, egg cups and rolling pins. The only thing you need to bear in mind when buying wooden items from kitchen shops is to make sure any wood you buy is light coloured like beech, maple, ash or birch. It might seem obvious but darker wood will not show your work up so well.

Lastly, and perhaps more interesting, is in keeping your eyes peeled in charity shops and places where they sell bric a brac. In these you will find many items that are made of wood and ripe for any pyrographer to take advantage of. Just a few words of caution if you go down this route. Please make sure that you remove any traces of varnish or other lacquer before burning into the wood.


Above, you can see a honey pot which my wife found in a charity shop. I sanded it down and did some flowers and bees on it with my pyrography iron. Then I coloured the items in just to give them a bit more life. That's the thing about pyrography, if you create something that doesn't quiet work you can always add a bit of colour if you want to.

In my next post I will tell you about the various mediums I use if I want to add colour to my pyrography.

If you would like to see more about me and my books please click here
Or if you would like to see some more of my pyrography work, please click here
Lastly if you want a special gift for somebody please visit my discounted pyrography shop on folksy.com which can be found by clicking here.

Sunday, 12 February 2012

Pyrography Tips

Hi All,
Apologies for the delay in making this post; my only excuse is that I've been busy getting my latest book in the Fishing Detectives series ready for publishing. I find writing books is an enjoyable challenge but getting one ready for publication can be quite a bind. Having said that, it is still a pleasure compared with some of the things I've been involved in over the years, but we won't go into that here.
Anyway, in my last pyrography post I discussed the pros and cons of the two types of pyrography iron that are currently on the market. The conclusion was that a fixed tip iron was cheap but if you wanted to do some fine work you would have to fork out more money for a hot wire pyrography iron.
Okay, so let's suppose you've had a rush of blood and decided to go down the hot wire route, what are the choices?
Well basically, there are two popular hot wire pyrography irons.
The Razor Tip or the Peter Child's. Both irons are very capable and the choice is often made on price. The Peter Child's machine retails at a shade under £110 where the Razor tip comes in at about £130.
The other difference is in the tips. On the left you will see the two main tips used in the Peter Child's machine. The wire tips can either be purchased for £2.40 for 10, or you can buy a roll of wire relatively cheaply and make your own. The spoon tips are a bit more expensive at £4.60 for 10, but they do last a long while. I have a Peters Child's machine and 90% of the work I do is with the spoon tip. The edge of the spoon can be used for fine work and the underside can be used for shading.
On the right, you can see a small selection of the many tips that are available for the Razor Tip. At first glance it might seem that this would be the best way to go, and perhaps it is, but I'm not so sure that there is a need for so many tips when a spoon tip will do much of the same work.

Having said that, I have two Razor Tip tips which I use in my second Peter Child's machine (I have a second iron (the pen part) to save me having to keep changing tips) one tip is used for doing heavy shading and the other is for lettering.

Now, I can see the money saving wheel going around in you head and you are probably thinking that if you buy the cheaper Peter Child's machine, you can still get the benefits of the range of tips that are manufactured for the Razor Tip and use them.

Well you could, because that is exactly what I am doing. However, please be aware that the suppliers of your Peter Child's pyrography machine may take a dim view of you using Razor Tip tips in their device. So I would suggest that if you decide to take that route, it is at your own risk.

I hope you've found the information on tips interesting and I'll leave it there for now. Next week I'll talk about where to get wood from.

If you would like to see more about me or my books please click here or if you would like to see some more of my pyrography work click here. My discounted pyrography shop can be found here, and last but not least, here is a link to a supplier of the pyrography machines and tips that have been mentioned in this post please click here.

Wednesday, 1 February 2012

Burnt Hare

Hi All,
I'm having a bit of a rest from writing this week. My sixth book, the second in the Fishing Detectives series is in the capable hands of my proofreading service, so I've managed to do a bit more pyrography.

During my last trip intoto Derbyshire I picked up some off cuts of wood from a cafe in Longnor. Now, you may wonder why a cafe would be selling lumps of oak alongside, cakes, cream scones and tea. The answer is that the cafe is also a gallery that sells a lot of pyrography pieces and that is why they had bags of wood for sale.

Anyway, seeing as the piece of wood I was going to work on looked very rustic, even after I'd sanded it down, it seemed to be calling for a rustic image. I decided on a hare because these creatures are quite magical and I hoped it would do the wood some justice. Below you can see the finished piece.
The big issue now is what should I do with it. Like a lot of artists I find it hard to part with some of the things I have created and this one definitely comes into that category. The other question is, if I did want to sell it, how much is it worth?
If you have any thoughts on the value that you'd put on the hare I'd be pleased to know what you think. I'm not trying to sell it I'm just interested in the value my readers would put on such an object, then if I did decide to sell it at a later date I could sell it at a discounted price on Folksy . com or my website.

I leave it there for now and get back to the box I am working on for Valentines day.
If you would like to find out more about me and my books please click here
or if you want to see more of my pyrography work click here
Click here to go to my discounted pyrography shop at Folksy.com Folksy.com

Sunday, 29 January 2012

Pyrography Irons

Hi all,
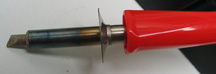
A lot of people have a go at pyrography and most of them give it up as a bad job. It starts out looking like the hobby will be exciting and fun, but often turns out to be hard and frustrating.The reason is probably down to the choice of pyrography iron. If you want to turn out nice pieces of work you have to invest in the right equipment.The pyrographer has two choices; the solid tip pyrography iron or the hot wire iron. A solid tip pyrography iron is pictured on the right.
Advantages
Relatively cheap
Comes with a selection of tips
Disadvantages
Not so easy to hold
Fixed temperature
Tips are relatively thick
These disadvantages make it harder to produce good work.The tip makes fine work difficult, not just because of the size of the tips, (pictured left) but because the iron is thick and more difficult to hold.
The pyrographer's hand is also further away from the tip which make control more difficult hence a lot of people give pyrography up and move onto something else.

Now don't get me wrong, it is possible with a pyrography iron to produce some acceptable results but it is much harder. On the right you can see the picture of a pansy book marker which I produced with my first solid tip pyrography iron.
Hot Wire (Pictured left)
Advantages
The temperature can be controlled
The iron is smaller, making it easy to hold. Plus, a pen like grip means the pyrographer's hand is closer to the tip.
The tip is smaller
Disadvantages The most expensive option.
Below, you can see a photo of a hot wire tip.
So, there are the choices and I guess the hot wire pyrography iron comes out on top. But, most of us hate spending money and to lash out a large sum on a piece of equipment for a hobby is not an easy thing for some people to do. They like me will be thinking back over money wasted on other hobbies that were just fads and came to nothing.

I started out with a fixed tip pyrograhy iron. It cost my wife about twenty quid and she got it me for my birthday. I used it for a couple of weeks and liked the feel of burning wood but was frustrated by the limitations of the solid tip pyrography iron. During this time I'd read a couple of books on the subject and found that the top people, who are involved in this form of art, use hot wire pyrography irons.

I struggled for a couple of days with my conscience and had a couple of sleepless nights, but eventually I prised open my wallet and spent about £100 on a really good pyrography iron.

The good news is, once I had bought the iron the cost of this hobby is almost zero if you take away the cost of the wood. Here is some more good news, hot wire pyrography irons can often be seen for sale on e-bay so it is possible to save money there. They also have lots of solid tip pyrography irons for sale, you may want to consider getting one of these first if you just want to give pyrography a try.

If you would like to see some more of my pyrography work please click here.
I sell some of my pyrography pieces, like the plaque of a common carp pictured right, at discounted prices on Folksy.com click here to see the shop

If you have any questions about pyrography please get in touch. Next week I will be looking at pyrography iron tips in more detail

Books
I do a lot of my wood burning as a bit of relief from writing and indeed I have worked on many plots whilst having the pyrography iron in my hand. My sixth book The Fishing Detectives: Bun in the Oven is in the proofreading stage and should be published before the end on February. This is the second book in the Fishing Detectives series and I know that it is eagerly awaited by those who have read my other fishing books.
If you would like to find out more about me or my books please click here

Monday, 16 January 2012

Pyrography; The Begining

Hi All
I thought that in this post I'd just explain how I managed to get into pyrography. Actually, it came down to something as simple as space. My main hobby has always been fishing, but I also enjoyed various forms of art.
I like painting in watercolours, daubing in acrylics and have also enjoyed doing some pen and ink work. On the right you can see one of my early watercolours.
The trouble with these hobbies is that take up a lot of space, and that is one commodity I have been short of. I have a computer work station set up to write my books, but only a small desk on which to do any other work. Every time I want to do a painting I have to get out my paints, water pots, brushes and pallets etc. Well, we all know what happens when faced with that sort of scenario and I'm no different, more often than not I couldn't be bothered and turned to something else for entertainment. Below you can see a pen and ink study of eyes. Please click here to see more artwork Anyway, one day my wife and I were having a glorious day out in Derbyshire, we called at a cafe in Longnor for one of their delicious cream teas. I know I probably shouldn't eat such food after my heart attack, but hell, enough of my pleasures have already gone down the pan with the onset of old age. I'm sure an occasional bit of clotted cream, jam and butter on a fruit scone won't clog my stents up too quickly.

Besides being a nice cafe, the tea room in Longnor also sells crafts and the walls are adorned with pieces of pyrography artwork. I guess I was halfway through my scone when my wife suggested I had a go at doing some pyrography myself. Her thoughts were propelled by the fact that my 60th birthday was imminent and she was at a loss regarding a suitable present. I couldn't think of anything else I wanted, so it was agreed that she would get me a pyrography iron and see what I could do.
I don't know if it was because I'd already done some drawing and painting, but I took to pyrography like a mouse to a trap and was soon knocking out pieces that I was pleased with. I did the rooster on the right about three months after getting my first pyrography iron. I think that is important when taking up any sort of creative activity, judge your results by how much your efforts please you, and not what other people think.

The really good thing about pyrograhy, which I mentioned in my last post, is the fact that the equipment takes up hardly any space at all. I have the piece of wood that I am working on on my desk and, if I feel like having a go, I can switch the iron on and be burning wood in less than a minute. Even better than that, when I've had enough I just switch the pyrography iron off and that's it. I don''t have to bother with emptying water jars and cleaning pallets.

In my next post I will give you advice about pyrography irons because anybody who takes up this hobby needs to get the right one. I'll leave you with my latest creation, which I will be probably selling on Folksy.com shortly.
If you would like to see my pyrography website, please click here.
If you would like to see some pyrography items for sale at discounted prices on Folksy please click here.
Beyond that, if you are interested in finding out more about me or my books, please click here.

Monday, 9 January 2012

Burning Desire

Hi all,
This is my new blog which replaces "A Sassenach's View of Scotland," I couldn't do anymore of those because I've run out of material. If ever I get the chance to go on holiday ever again, Scotland will be my destination and I will give you a blow by blow account.
In the meanwhile, I hope to entertain you with information about pyrography and other forays into the world of art. On the subject of art, I saw a report on last night's news that said that people who were involved in any sort of art felt better and visited the doctor less often than those who are not interested in the subject. I can see how that could work, but given my general state of health, it must mean that if I wasn't doing a bit of art work I'd have one foot in the grave.
So what is pyrography, I hear you ask.
Well, it's nothing complicated that's for sure because if it was I wouldn't be doing it. I've had enough stress in my life to scuttle a battleship and I've got stents in my heart to prove it. For me, hobbies must be free of stress, so I guess skydiving missed its chance.
Pyrography, literally means, writing with fire, but in reality it means using something that looks similar to a soldering iron to burn pictures into wood, like the one on the right of a woodpecker.
Pyrography has got lots of advantages over other forms of art, especially when it comes down to cost. Once you have purchased a pyrography iron all you need are some bits of wood to work on. There is no need to keep spending money on paint and brushes etc. Another advantage of pyrography is that it doesn't take up much room. I've tried painting in oils, acrylics and watercolours but they take up a lot of space and time. To paint properly one needs a big space for the paints, pots of water and mixing pallets etc, whereas with pyrography all you need is the iron and the lump of wood you are working on. No time is wasted on, changing pots of water or cleaning pallets, with pyrography I just sit down and get on with it instantly.

If ever you've thought of doing something arty but you can't be bothered with getting all the kit out, pyrography might be just the thing to try.

I have only been doing pyrography as a hobby since last April, but I'm very pleased with what I've produced so far and have also sold a few items. Okay, the profits may be small, but if I can get my hobby to pay for itself then I'm happy enough with that.

In future pyrography posts I will explain where I get my wood from and how I go about my projects. For now, I'll leave you with one of my latest creations, a nice little pot that is perfect for giving a ring to a loved one on Valentines day.
If you have any questions about pyrography, please don't hesitate to get in touch.
If you would like to see more of my pyrography Please click here,
or if you would like to find out more about me and my books, click here.
If you are interested in buying any of my pyrography items at discounted prices please click here.

Wednesday, 28 December 2011

The Last Post; Scotland

Hi All,
Here is my last post regarding our tour of Scotland. It was mid-afternoon when we left the Kyle of Tongue and set off down the lonely A836 to Laig. Unhappily for us our journey wouldn't end there because the following morning we'd be heading further south and after a stop over in Moffat, we'd find ourselves back in the urban sprawl we call home. Still enough of that for now, let's get back to the journey.
After a few miles we came to Loch Loyal which was in a splendid setting surrounded by moorlands and mountains. The road sticks to the shore for the whole of it's length presenting visitors like us with a splendid panorama. Above I can be seen viewing one of the many lochs that can be found in this part of Scotland. Once Loch Loyal was firmly in our rear view mirror we carried on through a remote landscape until we came to Altnaharra. This is a small settlement with an hotel and a few guest houses which are no doubt kept busy by Munro Baggers (people who are obsessed with climbing mountains over 3000 feet high). The hamlet is situated on a crossroads, which is rare in this part of Scotland. A very small road heads off to the west, down through Strathmore to emerge on the north coast near Loch Eriboil, which we passed through earlier in the day. The other road out of Altnaharra heads due east and follows Loch Naver which lies just beyond the village.From here we carried on our journey southwards and after passing between two large mountains we arrived at Cask Inn. The place is named after what must be one of the remotest pubs in the British Isles. It's a very thirsty 12 miles from the nearest settlement at Lairg. .Eventually, we arrived back at the lodge and after spending another glorious evening watching eagles soar across the mountain tops opposite, we went to bed for the last time in Sutherland.My wife Terry Anne can be seen above scanning for eagles from the balcony of our lodge. The following day we were up early and set off on the long journey back to southern Scotland. I had intended on sticking to the A9 for most of the way but it was so busy when compared with the roads we'd be on, that when we got to Killiecrankie we turned right and followed a road around the almost deserted shores of Lock Tummel. Here we picnicked and walked the dog before commencing the rest of our journey to Moffat where we had a bed and breakfast booked for the night. We like Moffat even though it is always busy with tourists. We had a nice meal in the same hotel that we'd used a couple of years earlier and then for some unknown reason went for a short drive before retiring for the night. It was on this short excursion that when driving along the top of a ridge that looked over the M74 motorway we came across a roadside that was populated with parked cars and people with cameras and telescopes. They must be Twitchers (people obsessed with birds) I thought, perhaps there is an eagle in the vicinity. Anyway, being nosey we parked up and got out of the car to see what all the fuss was about and it turned out these people were Chuffers (people obsessed with steam trains) and a steam train was due up the valley at any moment. So we waited and watched with great excitement as the train came thundering along the pine tree covered valley that the railway track shares with the M74. If you look closely at the photo you can see one lane of the motorway and the cars.
Trains aren't really my thing but it provided a full stop to what had been a great holiday. As it happens the next morning we found ourselves sharing a breakfast table with another couple and when I told them about the steam train the man was almost in tears. Apparently he was he was an old chuffer of extreme persuasion and was mortified that he'd missed the event. We calmed him down by promising to send him a copy of the photo I took and he seemed well pleased with that.
After breakfast we drove non-stop back to Stafford and that was the end of our holiday. In fact it is the end of a Sassenach's view of Scotland because I have run out of material. You don't need to get the violins out, but due to domestic circumstances beyond my control we haven't been on holiday for over two years. However, the day will come when I and my wife will, with hearts full of joy and excitement, head north again to the majestic wilds of Scotland.

I hope you have enjoyed reading this blog as much as I have writing it and that you have a happy and prosperous new year.

If you would like to find out more about me or my books Please click here,
or if you would like to see some of my pyrography click here.
For my pyrography at special prices Please click here.
To see some of my wife's art and crafts click here.