Hi all,
I managed to sell the old big lathe for a very fair price so I'm happy about that.
As you can see in the picture above, it had its own stand and was quite a beast. It was a very good lathe and served me well until I decide that I was at my happiest doing small projects. Pens, jewelry and lidded boxes etc. I was sad to see it go but it at least it has found a good home in Cornwall.
Anyway, I decided to change it for a small bench mounted lathe. This is it, the AH1218VS from Axminster.
As you can see it is much small, but it is more than adequate for my needs. Another reason for the change was to free up some space for a band saw. I have never owned a decent saw; all my woodworking to date has been by hand, a jig saw or my scroll saw, which is great for cutting curves but crap when it comes to cutting straight lines.
After the old lathe went, I had a bit of a change around in the workshop and built a new bench for a bandsaw. Again I chose Axminster, I trust them and their customers' service is very good indeed.
Here is a picture of the bandsaw sitting proudly on its new bench.
I haven't had time to try the new lathe out in anger yet, but I managed to make a pen. It is turned from ebony with white inlays, which were done with Milliput. I guess most people know what Milliput is, but for those who don't know, it's an epoxy putty that can be used to fill cracks and then sanded. It dries very hard overnight and is used a lot by woodturners.
I really like how this pen turned out. It is made from a humble slimline kit which I modified to do away with the narrow centreband.
In my next post I'll hopefully have some more stuff to show you.
One last thing. Do you have a lawn and do you have gravel in your garden? If you do here is a word of warning. Last Sunday, I was mowing our lawn and the mower picked up a small piece of gravel and fired it into our conservatory door. There was a loud thwack sort of noise and there it was, one smashed door pane.
I have been mowing lawns for more than yonks and did not think this could happen to double glazing. In fact, I have always been under the impression that double glazed windows are unbreakable. Years ago I saw a man on the telly showing how tough they were by try, without success, to break one with a sledge hammer.
Anyway, I was fooled so don't get into the same trap as me. Replacing the glass is going to cost me a pretty mean £170 which is only just a few quid cheaper the money I've just lashed out for the bandsaw.
So check your lawn for stones and small pieces of gravel before you mow it and always mow with your back to the house. The reason for this is that most mowers throw stones out of the front or sides because the grass box on the back helps to prevent them coming out that way.
I did think that to break one's glass with a mower is a vary rare occurrence, but not at all. I googled it and it is very common, this fact was also confirmed when I rang the glaziers to arrange for some new glass. It happens all the time they said. So, now you've got the heads up, there is no excuse for breaking your own windows and forking out loads of dosh for replacement glass.
Any comments or questions are welcome.
Sunday, 27 August 2017
Friday, 18 August 2017
Wooden Jewelry
Hi All,
My wife's birthday came and went last week. I bought her a few presents that she'd ordered from me to save me getting the wrong thing. I remember once buying my ex wife a tartan shopping bag for her birthday and she wasn't impressed, in fact, she was a bit rude about my efforts. Who knows, it may have even started the slippery slope towards our divorce.
Anyway, my new wife isn't taking any chances with my present buying skills so she put her orders in and I just buy as I'm told. However, I do like to give her a bit of a surprise, so this time I thought I'd made her some wooden jewelry. She doesn't do sparkling bling stuff, which really suited me because I'm fresh out of diamonds.
I did her two jewelry sets, which consisted of a pair of earrings and a matching pendant. Here is my first effort.
They are turned from lime with burnt lines top and bottom. Between those lines I used my pyrography iron to burn some chequered squares which I then coloured in with Chestnut wood stains. They were then finished with several coats of melamine lacquer. As with the next set, I presented them with just the eye on top of each piece so that she could add her own findings.
The next set featured more pyrography with a leaf design on the front and back of each earring as well as on the pendant.
She was well pleased with my efforts which is a plus because I enjoyed making them. Turning small items really suits me so I've purchased a book with more wooden jewelry project in it. I won't copy them exactly, but adapt them for decoration with pyrography and stains.
Before that I'm going to get back to making some pens to get a couple of ideas out of my head.
Buy the way, there is more excitement because I have sold my big lathe and a smaller one is stiing in my workshop ready for setting up. It should be done in time for my next post so I will show you some pics of it then. Along with a couple of pens I hope.
My wife's birthday came and went last week. I bought her a few presents that she'd ordered from me to save me getting the wrong thing. I remember once buying my ex wife a tartan shopping bag for her birthday and she wasn't impressed, in fact, she was a bit rude about my efforts. Who knows, it may have even started the slippery slope towards our divorce.
Anyway, my new wife isn't taking any chances with my present buying skills so she put her orders in and I just buy as I'm told. However, I do like to give her a bit of a surprise, so this time I thought I'd made her some wooden jewelry. She doesn't do sparkling bling stuff, which really suited me because I'm fresh out of diamonds.
I did her two jewelry sets, which consisted of a pair of earrings and a matching pendant. Here is my first effort.
They are turned from lime with burnt lines top and bottom. Between those lines I used my pyrography iron to burn some chequered squares which I then coloured in with Chestnut wood stains. They were then finished with several coats of melamine lacquer. As with the next set, I presented them with just the eye on top of each piece so that she could add her own findings.
The next set featured more pyrography with a leaf design on the front and back of each earring as well as on the pendant.
She was well pleased with my efforts which is a plus because I enjoyed making them. Turning small items really suits me so I've purchased a book with more wooden jewelry project in it. I won't copy them exactly, but adapt them for decoration with pyrography and stains.
Before that I'm going to get back to making some pens to get a couple of ideas out of my head.
Buy the way, there is more excitement because I have sold my big lathe and a smaller one is stiing in my workshop ready for setting up. It should be done in time for my next post so I will show you some pics of it then. Along with a couple of pens I hope.
Tuesday, 8 August 2017
An Egg
Hi all,
I've been creating a bit of a theme recently regarding my woodturning and pyrography. First I turned and decorated this little pot.
I was so impressed with the way that it turned out that I did a vase using the same method and colours.
Again, I was very happy with the result so it should come as no surprise that when I did my next project I would decorate it in the same manner. The object that I turned was an egg, which I quickly put to the pyrography iron before colouring it in. It looked very nice when I put it on the mantle piece next to the two items above, but there was a problem, it kept rolling off.
It didn't take me long to figure out a solution because the egg cup had already been invented, so I stuck another piece of beech on my lathe and made an egg cup for it and decorated it in a matching fashion.
The colours, for those who haven't read my previous post, are from the Chestnut range of wood dyes. They are great colours and only one application is required to get a well saturated result. Using pyrography between each colour keeps them separate and stops them from seeping into each other.
If you have any question about the processes used above please let me know.
Lathe For Sale
If anybody is interested, I am selling my lathe on ebay.co.uk
You may remember a few weeks ago that I said I was going to concentrate on turning small items. Well I'm getting a smaller lathe that will do everything I want to do and allow me to free up some space for a band saw. I get the new lathe tomorrow so I'm looking forward to that.
I am now about to make some wooden jewellery for my wife's birthday and I will show you them in my next post.
By the way, the second book in The Fishing Detectives, series, "Bun In The Oven" will be free to download from Amazon from the 9th until the 11th of August. Please grab a copy while it is available. Just go to the BOOKS tab at the top of the page then click on the cover. Please enjoy.
I've been creating a bit of a theme recently regarding my woodturning and pyrography. First I turned and decorated this little pot.
I was so impressed with the way that it turned out that I did a vase using the same method and colours.
Again, I was very happy with the result so it should come as no surprise that when I did my next project I would decorate it in the same manner. The object that I turned was an egg, which I quickly put to the pyrography iron before colouring it in. It looked very nice when I put it on the mantle piece next to the two items above, but there was a problem, it kept rolling off.
It didn't take me long to figure out a solution because the egg cup had already been invented, so I stuck another piece of beech on my lathe and made an egg cup for it and decorated it in a matching fashion.
The colours, for those who haven't read my previous post, are from the Chestnut range of wood dyes. They are great colours and only one application is required to get a well saturated result. Using pyrography between each colour keeps them separate and stops them from seeping into each other.
If you have any question about the processes used above please let me know.
Lathe For Sale
If anybody is interested, I am selling my lathe on ebay.co.uk
You may remember a few weeks ago that I said I was going to concentrate on turning small items. Well I'm getting a smaller lathe that will do everything I want to do and allow me to free up some space for a band saw. I get the new lathe tomorrow so I'm looking forward to that.
I am now about to make some wooden jewellery for my wife's birthday and I will show you them in my next post.
By the way, the second book in The Fishing Detectives, series, "Bun In The Oven" will be free to download from Amazon from the 9th until the 11th of August. Please grab a copy while it is available. Just go to the BOOKS tab at the top of the page then click on the cover. Please enjoy.
Wednesday, 26 July 2017
Biro
Hi all,
Yesterday I received an exciting new bit of kit, it's not what most people would call exciting but it was for me. Some of you may recall that I had near life ending experience recently when a large spindle left my lathe at 2000 rpm and tried to club me to death. After picking myself up off the floor I decide that I would stick to small projects in the future.
I don't mind telling anybody that I've lost my confidence with big pieces of wood, so it was to be small stuff in the future. The trouble with small stuff is that when using a conventional 4 jaw chuck, one often finds oneself working too close for comfort to the spinning jaws of the chuck. This is not good for a woodturner who is but a few shakes away from being a quivering jelly. So, what I got from Axminster, (brilliant service by the way,) was a collet chuck. It is much smaller than my 4 jaw chuck and has made turning more comfortable. Work projects are mounted onto this chuck via a 12mm spigot and it works just fine. The price was reasonable and I'm well pleased with it.
Anyway, to try it out I decided to have a go at a pen but using the collet chuck instead of the usual pen mandrel. And, instead of using a pen kit, I decided to use the parts from a bic biro. I reckon most people know what a biro looks like, but for those who don't, here is the shell of the one I pinched the gubbin's out of.
I took a normal pen blank, not sure what the wood was because I got it from a bargain bin somewhere, and drilled a 3.8mm hole down the centre to take the nib and tube. Then I put a 12mm spigot on the end and mounted it into the collet chuck.
I did a few beads and some pyrography on it and then painted it with some acrylic paints that I nicked out of my wife's arty crafty mountain of bits. I then gave it 2 coats of medium CA for a finish and here it is.
Not bad for a 25p blank and an inexpensive biro. If it runs out of ink I will just stick another nib and ink tube from another biro in it. Not that I will get the chance because my wife's face lit up like Blackpool illuminations when she saw it. A few seconds later she was busy practising her signature in a note book. "What a lovely writer," she said, "I'm having that."
She was stunned when I told her that it was just a biro, so perhaps perception goes a long way even in the pen turning world.
By the way, I am giving away free downloads of one of my books on the 27th and 28th of July.
It's the first book in the Fishing Detectives series called "Carp Rustlers."
To get a free copy just click on the books tab at the top of the page and then on the cover.
It is a good laugh so I hope you enjoy it. In my next post I will show you an acorn box that I have just started
Yesterday I received an exciting new bit of kit, it's not what most people would call exciting but it was for me. Some of you may recall that I had near life ending experience recently when a large spindle left my lathe at 2000 rpm and tried to club me to death. After picking myself up off the floor I decide that I would stick to small projects in the future.
I don't mind telling anybody that I've lost my confidence with big pieces of wood, so it was to be small stuff in the future. The trouble with small stuff is that when using a conventional 4 jaw chuck, one often finds oneself working too close for comfort to the spinning jaws of the chuck. This is not good for a woodturner who is but a few shakes away from being a quivering jelly. So, what I got from Axminster, (brilliant service by the way,) was a collet chuck. It is much smaller than my 4 jaw chuck and has made turning more comfortable. Work projects are mounted onto this chuck via a 12mm spigot and it works just fine. The price was reasonable and I'm well pleased with it.
Anyway, to try it out I decided to have a go at a pen but using the collet chuck instead of the usual pen mandrel. And, instead of using a pen kit, I decided to use the parts from a bic biro. I reckon most people know what a biro looks like, but for those who don't, here is the shell of the one I pinched the gubbin's out of.
I took a normal pen blank, not sure what the wood was because I got it from a bargain bin somewhere, and drilled a 3.8mm hole down the centre to take the nib and tube. Then I put a 12mm spigot on the end and mounted it into the collet chuck.
I did a few beads and some pyrography on it and then painted it with some acrylic paints that I nicked out of my wife's arty crafty mountain of bits. I then gave it 2 coats of medium CA for a finish and here it is.
Not bad for a 25p blank and an inexpensive biro. If it runs out of ink I will just stick another nib and ink tube from another biro in it. Not that I will get the chance because my wife's face lit up like Blackpool illuminations when she saw it. A few seconds later she was busy practising her signature in a note book. "What a lovely writer," she said, "I'm having that."
She was stunned when I told her that it was just a biro, so perhaps perception goes a long way even in the pen turning world.
By the way, I am giving away free downloads of one of my books on the 27th and 28th of July.
It's the first book in the Fishing Detectives series called "Carp Rustlers."
To get a free copy just click on the books tab at the top of the page and then on the cover.
It is a good laugh so I hope you enjoy it. In my next post I will show you an acorn box that I have just started
Wednesday, 19 July 2017
Stained vase
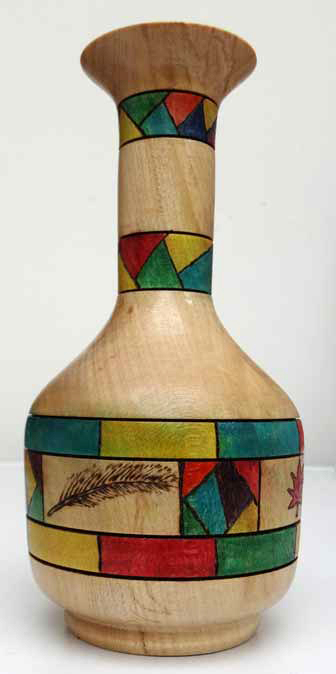
Hi all, to make a change from pots and pens I thought I'd have ago at turning another vase. I would be using stains again like I did on my last vase, but instead of mixing the colours up, like in the vase below, I would keep them separate.
I would also change the shape to make it bottom heavy. And before you ask. no it isn't hollowed out because my skills don't run that far. I have drilled a token hole in the top to show willing but my take on hollowing is that only woodturners are bothered about hollowing. Most people just want to look at the shape and the pattern, they are just not bother about wall thickness and the like.
Anyway, I turned the vase from a spindle of 3inch square sycamore and sanded it down to 400 grit. Then I cut some rings around it with the tip of a skew chisel and used a wire to burn lines into the grooves that I made. Once I knew exactly what the shape would be I did some sketches on paper to work out a pattern. These were then burnt into the wood with my pyrography iron. It is important when burning the lines to go deep enough to create a seal between areas of different colour. I used chestnut stains for the colour and these can seep quite deeply into the wood. If you don't burn deep enough you will soon find that the edges between two colours will mix, blue and yellow for instance, will soon turn green and that doesn't look very nice.
I did the colours in a random way trying to make sure that the same colour didn't finish up in adjacent areas. Once the staining was done, I brushed on a coat of cellulose sanding sealer, which wasn't 100% successful because it made one or two of the colours run slightly into each other. Next time, I will use a spray on type of sanding sealer so not to repeat the mistake. I then let the sanding seal dry before giving it a couple of coats of Chestnut melamine lacquer to give it a bit of a shine.
I hope you like it, any comments would be appreciated. Next week I will be giving away another free book so please come back for that.
I would also change the shape to make it bottom heavy. And before you ask. no it isn't hollowed out because my skills don't run that far. I have drilled a token hole in the top to show willing but my take on hollowing is that only woodturners are bothered about hollowing. Most people just want to look at the shape and the pattern, they are just not bother about wall thickness and the like.
Anyway, I turned the vase from a spindle of 3inch square sycamore and sanded it down to 400 grit. Then I cut some rings around it with the tip of a skew chisel and used a wire to burn lines into the grooves that I made. Once I knew exactly what the shape would be I did some sketches on paper to work out a pattern. These were then burnt into the wood with my pyrography iron. It is important when burning the lines to go deep enough to create a seal between areas of different colour. I used chestnut stains for the colour and these can seep quite deeply into the wood. If you don't burn deep enough you will soon find that the edges between two colours will mix, blue and yellow for instance, will soon turn green and that doesn't look very nice.
I did the colours in a random way trying to make sure that the same colour didn't finish up in adjacent areas. Once the staining was done, I brushed on a coat of cellulose sanding sealer, which wasn't 100% successful because it made one or two of the colours run slightly into each other. Next time, I will use a spray on type of sanding sealer so not to repeat the mistake. I then let the sanding seal dry before giving it a couple of coats of Chestnut melamine lacquer to give it a bit of a shine.
I hope you like it, any comments would be appreciated. Next week I will be giving away another free book so please come back for that.
Tuesday, 11 July 2017
Gone Potty
Hi all, I think I'm going potty. If you remember my last post, where I described my encounter with the big wooden club, you will forgive me for going small. In fact, I am really enjoying making smaller objects like pots.
I recently put a small piece of scrap sepele onto the lathe and thoroughly enjoyed turning this little pot. It took just over an hour and was easy to finish with a bit of stick wax followed by some microcrystaline wax made by chestnut.
I've put a 2p coin in the photo to show the scale.
These small pots also have the advantage of easy hollowing. All I do is put a jacob's chuck into the tailstock and drill the centre out with a forstner bit of the appropriate size.
The next pot I made was from a piece of sycamore. I burned a ring around the centre of the knob with a wire and did the same around the centre of the pot. A small groove is cut with a skew chisel to give the wire something to run in while burning. I then divided the space between the two burnt bands into triangles with my pyrography iron. These were then coloured with various shades of chestnut stain.
Before I did the colouring I did a bit of experimenting with various methods of colouring wood and whether it was better to use sealer before or after colouring.
I tried Chestnut wood stains, some inks that I use in my airbrush and sharpie markers. I know that a lot of woodturners are using sharpie markers and thought they might be easier to use than ink or stains. The sharpies were certainly much easier to use but I'm afraid that the results were not to my liking, The inks were also less appealing than the chestnut stains so I will be sticking to them in the future. Regarding the sanding sealer, I found that is much better to use it after the stain has been applied for projects like this where you want the stain to penetrate the wood. However, if you are doing colouring like on the pot below it is better to apply the sealer first so that the stain sits on the wood and mixes well with the other colours.
Anyway, the coloured pot was a success and I'm going to expand the theme and go a little big. Not clubbing wood size, but at least a little bigger.
By the way, just in case anybody is interested. When I was 16, my dad dragged me off to Australia, I didn't want to go but had no choice. Anyway, I wrote about my episode down under in a book called "The Reluctant Pom" and I am giving away free downloads this week on Amazon.
The book will be free from the 12th of July until the 14th and can be downloaded by clicking on the books tab at the top of the page and then the books cover, which will take you straight to the link on Amazon. Please grab a copy and have a good laugh.
I recently put a small piece of scrap sepele onto the lathe and thoroughly enjoyed turning this little pot. It took just over an hour and was easy to finish with a bit of stick wax followed by some microcrystaline wax made by chestnut.
I've put a 2p coin in the photo to show the scale.
These small pots also have the advantage of easy hollowing. All I do is put a jacob's chuck into the tailstock and drill the centre out with a forstner bit of the appropriate size.
The next pot I made was from a piece of sycamore. I burned a ring around the centre of the knob with a wire and did the same around the centre of the pot. A small groove is cut with a skew chisel to give the wire something to run in while burning. I then divided the space between the two burnt bands into triangles with my pyrography iron. These were then coloured with various shades of chestnut stain.
Before I did the colouring I did a bit of experimenting with various methods of colouring wood and whether it was better to use sealer before or after colouring.
I tried Chestnut wood stains, some inks that I use in my airbrush and sharpie markers. I know that a lot of woodturners are using sharpie markers and thought they might be easier to use than ink or stains. The sharpies were certainly much easier to use but I'm afraid that the results were not to my liking, The inks were also less appealing than the chestnut stains so I will be sticking to them in the future. Regarding the sanding sealer, I found that is much better to use it after the stain has been applied for projects like this where you want the stain to penetrate the wood. However, if you are doing colouring like on the pot below it is better to apply the sealer first so that the stain sits on the wood and mixes well with the other colours.
Anyway, the coloured pot was a success and I'm going to expand the theme and go a little big. Not clubbing wood size, but at least a little bigger.
By the way, just in case anybody is interested. When I was 16, my dad dragged me off to Australia, I didn't want to go but had no choice. Anyway, I wrote about my episode down under in a book called "The Reluctant Pom" and I am giving away free downloads this week on Amazon.
The book will be free from the 12th of July until the 14th and can be downloaded by clicking on the books tab at the top of the page and then the books cover, which will take you straight to the link on Amazon. Please grab a copy and have a good laugh.
Tuesday, 4 July 2017
Near Miss
Hi all,
This post is for turners who are becoming complacent and a reminder that woodturning can be a very dangerous hobby. Those new to turning might also benefit from the words contained within.
Let me say up front that I'm not a reckless or fool hardy kind of guy. In fact, I am probably on the boring side of cautious, but that didn't prevent me from almost coming to a sticky end. The reason I have always been cautious is because I don't like the thoughts of getting caught up with machinery that is revolving at high speed and I don't like the thoughts of anything coming off my lathe at speed.
So, you may be asking how did I come to be in a near death situation? Well here is how.
I wanted to make a vase and colour it like I'd seen another woodturner do it on Youtube. To get the piece of wood that I would need meant that I would have to take it from a 3 inch square piece of sycamore that was 24 inches long. This was twice as long as anything I'd tackled before, but at the time it didn't seem too daunting. So I mounted on the lathe with a view to rounding it off with my roughing gouge.
I say I wasn't concerned about the task in hand, well not to begin with, but as soon as I started the lathe the big whirling piece of wood became very menacing as it spun around between centres.
Anyway, I decide that taking my time and taking light cuts was the order of the day and I made sure that my gouge was good and sharp. Despite, being aware of the dangers and proceeding with caution, I was still surprised to find myself, a few moments later, recovering from the floor with pains in my wrist and chest.
I had been literally stunned and knocked to the floor as the piece of timber had left the lathe and tried to club me to death. I know it must have hit me in the face shield first because that was damaged and was why I was knocked to the floor. but while it was spinning around it must have also hit me in the chest and arms because those were both very painful. I was most concerned about the chest pains because I have suffered a heart attack in the past and had 2 stents fitted.
Needless to say, I was a bit shook up and staggered to the kitchen where my wife administered her soothing touch and made sure I wasn't seriously injured. Thankfully, I escaped with just bruises and a dent in my confidence. I am also thankful for the quality of the JSP power cap that managed to take the brunt oh the impact. I only got this helmet for my birthday in April and it was purchased mostly with dust avoidance in mind. Little did I know then that it might be responsible for saving my life.
So, what went wrong?
There were two issues. Firstly a catch. I must have had a momentary lack in concentration and I allowed the tool to dig in. You can also see on the photo that there is a small knot at the place where the catch occurred, This may have had a bearing on the situation but I'm not sure.
The other issue was the poor security that was afforded by the tail stock. I should have made sure the revolving centre went further into the wood so that if I had a catch it would be less likely to leave the lathe.
You can see by the photo that the depth of hole where the revolving centre went into the wood just wasn't big enough for the size of wood I was turning.
You will be pleased to know that I did put the lump of wood back on the lathe again after drilling a hole over a quarter of an inch deep to take the revolving centre. And I did complete my project. However, If I was nervous about big lumps of wood coming off the lathe before the incident I was now even worse, so I have made a deal with myself. Stay small and stay safe is my new mantra so don't expect to see any massive bowls on this blog anytime soon.
Anyway, I thought you might like to see the finished vase that almost cost me big style.
It was meant to look like a ceramic vase and I think it does just that. The colours are stains made by Chestnut, which were dabbed on with kitchen towel. I am quite happy with it although I hadn't done a very good job of the sanding and that left a few tooling marks. I should have paid more attention but it is easy to miss them until the stains are applied, then they stick out like a soar thumb.
By the way here is a link to the brilliant Gary Lowe's video on youtube
This post is for turners who are becoming complacent and a reminder that woodturning can be a very dangerous hobby. Those new to turning might also benefit from the words contained within.
Let me say up front that I'm not a reckless or fool hardy kind of guy. In fact, I am probably on the boring side of cautious, but that didn't prevent me from almost coming to a sticky end. The reason I have always been cautious is because I don't like the thoughts of getting caught up with machinery that is revolving at high speed and I don't like the thoughts of anything coming off my lathe at speed.
So, you may be asking how did I come to be in a near death situation? Well here is how.
I wanted to make a vase and colour it like I'd seen another woodturner do it on Youtube. To get the piece of wood that I would need meant that I would have to take it from a 3 inch square piece of sycamore that was 24 inches long. This was twice as long as anything I'd tackled before, but at the time it didn't seem too daunting. So I mounted on the lathe with a view to rounding it off with my roughing gouge.
I say I wasn't concerned about the task in hand, well not to begin with, but as soon as I started the lathe the big whirling piece of wood became very menacing as it spun around between centres.
Anyway, I decide that taking my time and taking light cuts was the order of the day and I made sure that my gouge was good and sharp. Despite, being aware of the dangers and proceeding with caution, I was still surprised to find myself, a few moments later, recovering from the floor with pains in my wrist and chest.
I had been literally stunned and knocked to the floor as the piece of timber had left the lathe and tried to club me to death. I know it must have hit me in the face shield first because that was damaged and was why I was knocked to the floor. but while it was spinning around it must have also hit me in the chest and arms because those were both very painful. I was most concerned about the chest pains because I have suffered a heart attack in the past and had 2 stents fitted.
Needless to say, I was a bit shook up and staggered to the kitchen where my wife administered her soothing touch and made sure I wasn't seriously injured. Thankfully, I escaped with just bruises and a dent in my confidence. I am also thankful for the quality of the JSP power cap that managed to take the brunt oh the impact. I only got this helmet for my birthday in April and it was purchased mostly with dust avoidance in mind. Little did I know then that it might be responsible for saving my life.
So, what went wrong?
There were two issues. Firstly a catch. I must have had a momentary lack in concentration and I allowed the tool to dig in. You can also see on the photo that there is a small knot at the place where the catch occurred, This may have had a bearing on the situation but I'm not sure.
The other issue was the poor security that was afforded by the tail stock. I should have made sure the revolving centre went further into the wood so that if I had a catch it would be less likely to leave the lathe.
You can see by the photo that the depth of hole where the revolving centre went into the wood just wasn't big enough for the size of wood I was turning.
You will be pleased to know that I did put the lump of wood back on the lathe again after drilling a hole over a quarter of an inch deep to take the revolving centre. And I did complete my project. However, If I was nervous about big lumps of wood coming off the lathe before the incident I was now even worse, so I have made a deal with myself. Stay small and stay safe is my new mantra so don't expect to see any massive bowls on this blog anytime soon.
Anyway, I thought you might like to see the finished vase that almost cost me big style.
It was meant to look like a ceramic vase and I think it does just that. The colours are stains made by Chestnut, which were dabbed on with kitchen towel. I am quite happy with it although I hadn't done a very good job of the sanding and that left a few tooling marks. I should have paid more attention but it is easy to miss them until the stains are applied, then they stick out like a soar thumb.
By the way here is a link to the brilliant Gary Lowe's video on youtube
Subscribe to:
Posts (Atom)